A lesson in making sourdough bread for y’all!
I know, I know, I’m not Southern. Gosh, I’m not even American. I just really enjoy using the word (phrase?) y’all, because it sounds friendly and cute and personable… at least, to me it does. So, ummm, anyways…
Let’s bake some bread!
Simple Sourdough Bread (really!)
I suppose the only thing not simple about this bread is that first you have to make the starter, and it has a long rising time (well, two to be precise). So it’s a process, not an instant gratification kind of bread. But if you’re ok with that, and excited to create your very own, incredibly healthy and delicious sourdough, then here we go:
(This recipe comes from the book How It All Vegan)
Now, I enjoy kneading bread, but my hands (I have eczema) don’t enjoy it at all! Especially with sourdough, it seems to really irritate my skin. This weekend I discovered that I could easily adapt the sourdough process to use a breadmaker and save my hands all that irritation! Yippee!
Here’s how:
Simple Sourdough Bread Recipe
Ingredients
To make the bread (this makes 2 loaves), you'll need:
- 5-7 cups flour the book I got this from says whole wheat pastry flour, but really, use what you want. I really enjoy both spelt, and a spelt or wheat combo with rye, or just wheat.
- 2 1/2 cups water
- 1/2-3/4 cup sourdough starter I tend towards the 3/4 cups starter, so I add slightly less water
- 1 tsp salt
Instructions
- A couple hours before you're ready to start, take your starter out of the fridge, give it a good stir, and let it sit on the counter to come to room temperature (you may notice that it totally separated while in the fridge and looks a strange purple-ish color- once you stir it well, it'll be just fine- really!). In a large bowl, start with 5 cups of flour, the water, starter and salt. Stir well, and slowly add the remaining flour, a bit at a time. Knead dough until smooth and consistent.
- Let the dough sit overnight in a well-oiled glass or ceramic bowl (plastic can interfere with the fermentation process of the starter). Roll the dough around so it's covered lightly in oil, and cover with a cloth. My book says to leave it for 12 hours. I generally make mine before bed, around 9pm, and then knead it in the morning after breakfast, (8:30 or 9), so there's my 12 hours.
- Knead the dough again for 3-5 minutes (you may need to add a little more flour if it's too sticky). Cut it in half, and you can either place them in in lightly oiled pans, or shape into a loaf and use a cookie sheet. Cover and let rise again for 6 more hours (or until desire size). I let mine go until the mid afternoon, just before I start cooking dinner (maybe 3 or 4pm).
- Bake loaves at 425 F for 15 minutes, then reduce heat to 350 and bake for another 45 minutes or until golden brown. Check with a knife to see if done. I find for spelt that I can lower the oven temperature when I first put it in, rather than waiting 15 minutes, otherwise it can get a little too hard, and sometimes I do more like 50-55 minutes. I've changed ovens many times, so it feels like I am always changing my method a little.
- Top up your starter by adding equal parts flour and water to make up for what you used. Mix with well, and leave on the counter for a few hours, then put the lid on and put it back in the fridge.
1) Add ingredients to your breadmaker on a dough setting, except you will have to cut the recipe in half, as the breadmaker only makes enough dough for one loaf. Seemed that I needed about 3 1/2 – 4 cups using spelt flour. Also, make sure you oil your breadmaker pan before you start, as this will help to prevent too much sticking on the sides. The first time you try it, watch it carefully, and use a spatula to push any sticky dough back down, and just to make sure your liquid/flour ratio is good.
2) When dough finishes, put it in an oiled bowl and let rise, just like Step 2 above.
3) The next morning, put it back in the breadmaker on another dough cycle, but it’s really only necessary to let the machine go for a little while (my dough setting is 1 hour, but I only let it go for about 15 minutes). Use bread pan or cookie sheet as desired, and allow to rise for 6 hours or so.
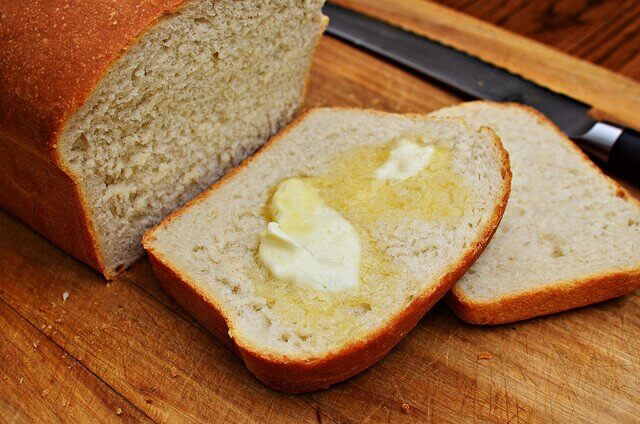
4) Bake as per Step 4 above. (This photo is before baking)
So easy!!!
I actually had two more bread recipes I wanted to share (yeasted breads), but I’ll have to save those for next week!


Thank you for posting this recipe! I mill my own flour and love sourdough bread, but have never actually made it myself! I’m going to try it out 🙂
I have been wanting to try baking sourdough bread! Is it considered to have more health benefits than regular whole grain bread? Your blog is so informative, I am a regular reader! I have been trying to think of a name, I am not very creative though! Thanks for the great post.
Thanks for posting this. I am hoping to try sourdough again and possibly succeed this time =)!!
Great recipe! I love that it doesn’t use yeast because there are no cheap sources around here (our Costco doesn’t even carry it). Thanks for posting it:)
I have been wanting to try and start my starter for sourdough bread but just havnt yet. I might try this one it looks easy to do. 🙂 Thanks!!!
Keep it up!
Nichole
http://blog.handmadebycole.com/
My husband spent a month trying to figure out his own starter and sourdough recipe. If he wants to try again, I’ll point him here.
Just a note. I took a day course from a baker last week and he talked about starters and said that they work the best when using distilled water or purified water, NOT tap water. Your starter can keep going for years and years, some in England are over 200 years old his starter was 4 years old.
I love sourdough bread! You can say “y’all” all you want to, to me at least! 😉 I am southern, trying to teach my Canadian friends to say it, because it just flows right off my tongue without even thinking about it. It’s just such a useful word! LOL
I think I know why my bread tends to rise more now! (You were asking about mine the other week). The recipe I use uses a LOT more of the sourdough starter, and a little less water. So maybe that’s why mine tends to rise really well! I will be posting my recipe soon (hopefully), and maybe you can try it, and see if that helps 🙂
Great recipe! I am looking forward to trying it. So far all our sourdough recipes finish up in one day. I think it would turn out better with all the rising time you have here. I’m going to try using my Kitchenaid to do the kneading.
Wow, that is really detailed. I would love to have go at making sour dough – yummy!
I have been wanting to have a go at baking my own bread for a while. I am just not sure that I am willing to invest in a breadmaker in case I’m not very successful:)
Thanks for posting this!
My aunt used to have a sour dough starter that was over 100 years old.
Everytime I hear about that, I feel like I really SHOULD have a sourdough starter in my own home and now I will!
Lizzie
Stephanie, I hope that my last comment didn’t sound negative about your bread! Your bread looks wonderful (it has a beautiful crumb). I was just responding to your question about my loaves rising well on my blog. But later I realized I could have sounded like I was being negative about your lovely loaves. 🙂
Anyway, if you were interested in experimenting, the recipe that I use, uses a whole cup of starter for every single loaf you make. My bread has generally risen very well and I think that high amount of stater has really helped me out a lot. So anyway, just a thought!
Kimi, I wasn’t offended in the slightest! It’s great to know what might make the difference between a good loaf of sourdough and a great loaf! I’m making some today, so I will try using a full cup and see how it turns out- I’ll post about it in a couple days. Thanks for the comments!
I have never heard of this. I started my started yesterday and so far so good. I hope this works because I love trying new bread recipes. Looking forward to your next recipes you mentioned.
Stephanie,
I am relieved to hear it! I sometimes don’t know how I am “coming across” online!
How funny! I am probably going to be baking some bread today too!
So with my recipe, I would use two whole cups of starter to make two loaves (like your recipe calls for) and I would use two cups of water with that amount of starter. So basically I have even amounts of starter and water. This might make your bread more sour, I don’t know. I like it though! 🙂
I have had a sourdough starter going for almost a year now, I make bread about once a week. I love it, it is SO easy! My family’s favorite is cinnamon bread right now, they love me to roll up cinnamon in the middle and it tastes like a cinnamon roll.
Stephanie I just put up an article on my own sourdough experience. I’ll be adding a link to your post here if you don’t mind. I love sourdough and make it weekly. I have 2 starters going in the fridge.
Sure, Q&Q, thanks for the link. I’ll have to check out your post on sourdough! I really enjoy making it too!
Hey there–I bought my first package of spelt flour today in hopes of finding a good recipe for bread. Thanks for this recipe! I just began my starter and I want to be sure I’m doing it right: mix the water and flour in the jar and simply cover with a cloth until it starts to bubble and smell sour? I don’t need to put a lid on it until I move to the step where I put it in the fridge? Just wanted to double check so I don’t ruin it! Thanks!
Glenna, for an example tutorial on making sourdough starter, check out this link:
http://heavenlyhomemakers.com/blog/category/sourdough-starter
It should answer any questions you have!
Hi there,
This sounds great! I noticed when you are making the starter you dont change bowls/jars each day……In the video you posted about the easy sourdough she mentioned changing the bowl every day for seven days. What are your thoughts?
You’re right, Caitllin. I had never previously been taught to do that when I learned how to make sourdough starter. However, I’m definitely going to try it the next time. Perhaps it will help me to make a starter that I like even better than the ones I’ve made before. I am continually learning new things about bread making! 🙂
thanks! What is the best way you think to store the leftover starter and how do you maintain it?